Thursday, October 30, 2008

A CRAYOLA QUILT.....

I have started a quilt project that may possibly take me through the entire winter season. Quilting happens in my family. My grandmother quilted. My Mother quilts. Most women in my family quilt. It must be genetic and it usually starts to happen when the leaves start to turn. We just can't help ourselves!
I went searching for a quilt pattern and discovered that the majority of the quilt patterns involve squares and triangles. The stress of getting tiny triangle points to match up was just more than I could handle. THEN, I found a wonderful quilt pattern site with hundreds and hundreds of quilt patterns, all free and with templates to download! If you are interested in making the same quilt you see here, go to www.quilterscache.com and you will find it on page 36 of the quilt patterns.
I found a quilt that uses circles. No points involved! The purpose of this quilt pattern is to use scraps of fabric that you already have and the whole idea is to try NOT to match fabrics in any way. The freedom of randomness. What a joy! Here are the cotton pieces from my stash, all washed and pressed and ready to become the "Crayola Quilt".
These are the pattern templates for this circle design quilt.
The design is placed on quilt squares measuring 16 1/2 inches and using a dark fabric. I chose black.. Here are the first few circles and the curved diamonds. These are the first four pieces I started with.
This photo shows the back side of the pieces. Each piece will need a piece of interfacing sewn on. Cut a slit in the interfacing and turn the piece inside out. This creates a smooth edge on the pieces.

This is the first finished quilt block. You will notice that the graphics are off center on the black fabric. I think this is because it needs to be that way so that an additional diamond piece can fit correctly between large circles in adjoining blocks. Because of all of the colors, I am using only red for the small circle in the very center. This, along with the black, will be a unifying color. I will need to make 35 more of these blocks if I want a queen sized quilt. What have I gotten myself into? I have to think of this as 36 individual projects. I can manage that! Now, go make a quilt!

Monday, October 27, 2008

A PLETHORA OF CHRISTMAS STOCKINGS!

I have finally finished making the Christmas stockings for the Bethel House holiday stocking project. These will be distributed to local groups and businesses to fill with toys. I have to confess, it makes me feel good to know I am helping to make so many children happy.
In the spirit of the season I encourage all of you to make some kind of contribution to a charity in your area. If you don't know how to volunteer, there are many web sites that will direct you to a particular need in your community. To get you started, here are two. http://www.1-800-volunteer.org/ and http://www.networkforgood.org/. I have to tell you, it is a real "feels good" moment when you realize you have done something to help or bring happiness to another person.

Friday, October 24, 2008

IDLE HANDS AND SCRAPS OF YARN

I had the yarn, I had hands doing nothing..I know winter is coming. Behold the 6 foot scarf in fall colors!

POSSIBLY ON THE HOME STRETCH!

Roy is plastering the ceiling in the bedroom. All we have left are the ceilings in the closet and the laundry room. When those are done, all of the big home improvement projects will be finished. Our home is getting to be really nice! It makes us smile a lot!

Wednesday, October 22, 2008

ALTERED COUTURE WINTER 2008

This is the fifth consecutive issue of Altered Couture Magazine that has featured one or more of my altered clothing designs. It is such fun to see my things in print! And, not to mention I do get paid for writing the technical article outlining the design process. It is scheduled to be on the shelf at Barnes and Noble on November 1st. If you are there, you could just glance through it, starting on page 61.
Incidentally, if any of you dear readers has a connection with a funky clothing boutique, I am searching for a wholesale or consignment relationship for my designs. If you can make that happen, there will be a one- of- a- kind embellished piece of wearable art just for you!

Monday, October 20, 2008

THE FLAVORS OF FALL......

I tried a new cookie recipe yesterday.......in honor of fall and weather changes and dreamy thoughts of Thanksgiving and family.

As a thank-you for stopping by my blog, I offer the recipe! How can you go wrong with pumpkin, spices, raisins, pecans and a tangy glaze of lemon zest and lemon juice. I hope you try these!

"PUMPKIN SPICE COOKIES"

1/2 cup shortening

1 cup canned pumpkin

1 cup sugar

2 eggs, beaten

2 teaspoons baking powder

1 teaspoon salt

1/2 teaspoon nutmeg

1/4 teaspoon ginger

2 cups flour

1 cup raisins

1 cup chopped pecans

2 1/2 teaspoons cinnamon

Cream shortening, sugar and eggs and beat well. Add the pumpkin and mix well. sift all dry ingredients and gradually add to the wet mixture. Add the raisins and chopped nuts. Drop by spoonful onto greased baking sheet and bake at 350 degrees for 12-15 minutes.

"LEMON GLAZE"

Combine 2 cups of powdered sugar with 1 tablespoon lemon juice and 1 tablespoon lemon zest. Add enough milk to spread on baked cookies. Enjoy!!

A SURPRISE FROM THE SKY THIS MORNING.....

Well hail......

Tuesday, October 14, 2008

A CHALLENGE FOR YOU!

Today is cold (35 degrees) and rainy and dismal and gray. I needed a project! Dear readers, take a look around you at the switch plate covers in your house. I am guessing most if not all of them are white or cream colored plastic, right? OK..that is just plain boring! So, I challenge you to make them colorful! They serve to keep our fingers from touching wires, so they need some respect and some color, right? Here is what I did. I found a copy of "Martha Stewart Living", a magazine that has beautiful photographs on very good quality paper. I selected some of them and cut them out slightly larger than the switch plate to be covered. Brush some Mod Podge (or any white glue that dries clear) on the plate and lay the selected photo on the plate. If you have a brayer, roll it over to get a nice adhesion. Then, flip the plate over and cut out the corners of the paper so that you end up with wide tabs on each side. then, add glue to these flaps and fold them to the back side. Now, take a craft knife and cut an X in each opening. Spread glue on these cut tabs and fold them to the inside. After all is secure, put another layer of Mod Podge all over the front to seal it. You are finished! How easy was that? I just know Martha would say "it's a good thing". Now, go make pretty switch plate covers; they deserve it!

Monday, October 13, 2008

THE NICHE.........

in our living room. A quiet place to rest your eyes.............

Saturday, October 11, 2008

OH MY! WE HAVE A NEW FLOOR!

After a few days recovery from The Shower Tile Project, it was time to move on to putting down a new floor in the kitchen/dining room/pantry. Roy did most of this project as it involved a very loud saw. I don't do loud tools. Here are some before, during and after photos of this really big and very cool floor. It actually is a little over 300 square feet, which includes the floor in my pantry. I can now walk barefoot all over it! It is grand!

This is "belle" full of "Boxes-O-Floor" from Lumber Liquidators, my new favorite place to shop!Step one: Take up part of the old floor and crawl under the house to move the Dish TV cable so I could rearrange the furniture (a most necessary step I thought).Step two: Remove the old skanky carpet from the kitchen area that we put down originally to keep the cold wind from blowing up between the floor boards.Step three: With a drill and 15 pounds of screws, go all over the floor and screw the plywood down so it won't squeak any more. This step almost ruined Roy's back!Step four: Tape down a moisture barrier (is that really necessary in New Mexico?). I will say that walking on that is really slippery.Step five: Begin the actual installation of the floor! And now you get to see the finished project. It has made a BIG difference in our home!

This is the kitchen area of the room. And below is the dining area.Our wonderful wood stove that looks like a piece of sculpture, majestic in its simplicity. 
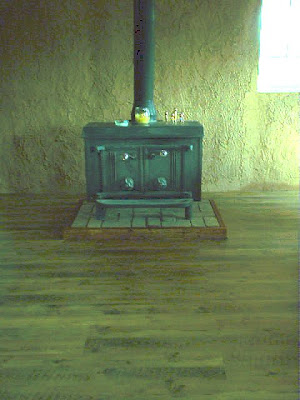
And our pantry.....how can anyone live without one of these?

Tuesday, October 7, 2008

FINALLY!

Now that I have accepted the fact that winter is almost upon us, I can begin to embrace the good parts of all that. Like, now I can wear my really cool denim jacket my daughter bought for me last summer. Of course, I managed to embellish the devil out of it! I have been waiting patiently for the opportunity to wear it and this morning was the day! Here are photos of it in all its glory, under a beautiful sunny blue New Mexico sky, with cold wind. The sun is really bright!
There are a lot of things hanging from the jacket, as well as shiny gems attached and lots of stitching. I love it! Now, go find a jacket and make it sparkle!

Sunday, October 5, 2008

IT HAPPENS EVERY YEAR....

I know it does. I expect it. I think I am prepared for it. I never really am. I'm talking about the weather in New Mexico. It seems to catch me off guard as it moves swiftly from Summer to Winter, with about 4 hours of Autumn in there someplace!
Today it happened. ( or rather last night) It is quite chilly, it rained all last night, and it is cloudy today. We are used to beautiful blue skies day in and day out. This is not that.
So, as I probably do every year, I made soup. I will give you the ingredients, but I really don't measure anything. You are on your own there! I never make the same soup twice. I use whatever I have, in whatever amounts I have. It really is like a creative piece of art! Here ya go:
"Summer to Winter soup"
2 cans of chicken stock
1 can of diced Italian tomatoes
dried peas
lentils
onions
fresh mushrooms
barley
carrots
salt and pepper
olive oil
Saute onions, mushrooms and carrots in the olive oil. Then add all the other ingredients and simmer. How easy is that?
Go make soup; it makes you feel good!