
Thursday, January 28, 2010
Wednesday, January 27, 2010
THE VANESSA DOLL COLLECTION...
After making the four wall dolls I decided to try making some smaller and hopefully more affordable dolls. The dolls in this new collection are approximately 12 inches tall and are fabric shapes filled with a poly fiber filling. They have polymer clay faces made using art doll molds. Their "feet" are either clay, or beads or Mylar paper beads I made some time ago. Here is the basic shape for the doll.
 I cut 2-inch wide strips of fabric from scraps I had, using all the bright colors I like so much! Then, I laid them out to stitch together, making sure that the final piece would be large enough to fold in half to make both the front and back of the doll.
 Here you can see the five dolls, stuffed and with the beginnings of bead and thread embellishments.
 These are two pairs of feet/legs made from polymer clay.
 This is a closeup of the head of one of the dolls, complete with lots of hair.
 This photograph shows all five sets of "feet".
 Here you can see some of the embellishments, decorating being my favorite part of the whole process.
 And, here are the ladies of "The Vanessa Doll Collection"


Saturday, January 23, 2010
FOLK ART DOLL #4
This doll is made from paper mache and fabric, as well as body parts from two dolls, some beaded wings and some dried moss which gives her a sweet "bad hair day" look.
 "Beatrice" - paper mache and fabric - 22 " tall

 "Beatrice" - paper mache and fabric - 22 " tall
Here you can see the "doll wall" in my studio. I LOVE looking at them! I have been thinking about a different direction, but still making dolls, and will share with you when I have something more concrete than whatever is spinning around in my head. Stay tuned.... I have ideas! (the kind that keep me awake at night.)


Tuesday, January 19, 2010
FOLK ART WALL DOLL # 3 ...
 "no name" - paper mache and fabric - 28" tall

Doll # 3 is completed and I love the brightness of it. I do need some help from you, my readers. I would like some name suggestions from you! Any ideas?
Doll # 4 is in process on my work table. I will give you a hint: she has wings!
Sunday, January 17, 2010


Tuesday, January 12, 2010
THE FABULOUS DEE MARCELLUS COLE...
Now that you have seen my first attempt at a folk art wall doll, I want to introduce you to the artist who has inspired me to try my hand at dolls. You can see her work by clicking on "Dee's Sculptures" right over there on the blog sidebar. This lovely lady lives in Upland Ca and lives in a fairyland house totally decorated from top to bottom, inside and out with fabulous color and design. On her roof and in her courtyard are wonderfully painted mannequins and all manner of sculptures. Here is a photograph of her three most recent wall dolls. Aren't they fantastic? Dee has generously shared doll making tips with me and has been very supportive. So, if you have the time, please check out her web site at www.3dee-art.com. There you will also see her very big, larger than life, paper mache sculptures. (like the one shown below).
 Thanks Dee!!
Here is a photograph of her three most recent wall dolls. Aren't they fantastic? Dee has generously shared doll making tips with me and has been very supportive. So, if you have the time, please check out her web site at www.3dee-art.com. There you will also see her very big, larger than life, paper mache sculptures. (like the one shown below).Thanks Dee!!Sunday, January 10, 2010
HAPPY IN DOLL LAND..!
With a hazy vision in my head I began assembling things I thought I might need to create a wall doll. This included brushes, all manner of paper scraps and fabric, cardboard, Sculpy modeling clay, tape, various glues, paints, wire, beads, various doll body parts and buttons. 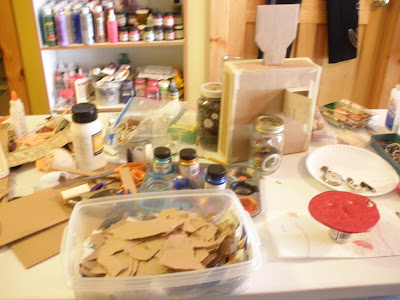
 After building the doll body I added several layers of paper mache and a small box on the doll body front.
 Then the doll arms and legs were attached.

 Before the unveiling of "Mirabella", you have to see the carnage of my studio work tables. It does take awhile to clean up after a project that requires so many elements.

 And now you can begin to see parts of this doll: the body front with a small box attached and containing a small fabric heart.
 The funny face with her rhinestone smile, some teeth missing.

 "Mirabella", fabric and paper mache wall doll, 21" tall.
MAIL ART READY TO GO....
I hope you are considering this worthwhile project. If nothing else, the postal employees get a treat! Postmarked 2010.

Saturday, January 9, 2010
OH DEER !!
As if by magic, they appeared. Quietly and softly they emerged from the woods. There were five of them. They were very busy eating anything that might have, at one time, been something green. Now, all they can find are dry twigs. They look well fed however. We moved slowly inside the house, from window to window with the camera. Using the zoom makes for some fuzziness but you can see how absolutely beautiful they are! They would raise their heads and look straight at us. Or so it seemed. Eventually they headed up the hill, gracefully jumping over snow covered bushes, totally effortless in their movements. I hope they come back soon.


Thursday, January 7, 2010
NIGHT BLOOMS...
I thought I would show you how I begin a painted fabric piece of art. Here I am laying down several colors of acrylic to create the background. I use a plastic credit card to move the colors around and find this gives me the depth and randomness I like. ( this would be the smartest way to use a credit card, right? )

This is the background fabric before I applied the paints.
 Here you can see the other piece of fabric on which I have put down several contrasting colors to use in the design that is just beginning to form in my head. After it has dried, I cut out three very simple flower shapes using a transparency. This way I can position them on the fabric to get the various colors where I want them before cutting out the shapes.
 This photograph shows the initial arrangement of the flower elements. I continued to move them around until I was happy with the balance.
 This is a close up of the finished piece. In addition to acrylics I also used oil pastels to get more depth and shading.

 Here you can see the other piece of fabric on which I have put down several contrasting colors to use in the design that is just beginning to form in my head. After it has dried, I cut out three very simple flower shapes using a transparency. This way I can position them on the fabric to get the various colors where I want them before cutting out the shapes.
This photograph shows the initial arrangement of the flower elements. I continued to move them around until I was happy with the balance. This is a close up of the finished piece. In addition to acrylics I also used oil pastels to get more depth and shading.
Here you can see the other piece of fabric on which I have put down several contrasting colors to use in the design that is just beginning to form in my head. After it has dried, I cut out three very simple flower shapes using a transparency. This way I can position them on the fabric to get the various colors where I want them before cutting out the shapes.
This photograph shows the initial arrangement of the flower elements. I continued to move them around until I was happy with the balance. This is a close up of the finished piece. In addition to acrylics I also used oil pastels to get more depth and shading.

"Night Blooms" 17" X 23" - painted fabric I am taking a short break from "painted fabric" to make a doll. I have already assembled the components and have begun construction and will share the process and the end result with you. I'm looking forward to it! Doll making is a lot of fun!
 I am taking a short break from "painted fabric" to make a doll. I have already assembled the components and have begun construction and will share the process and the end result with you. I'm looking forward to it! Doll making is a lot of fun!
Wednesday, January 6, 2010
EUREKA ! !


 Dude, you got some SNOW here!
 After about two hours of plowing and hand shoveling, we actually drove down our driveway, stopped at the mailbox, and then off to the market. It's good to be liberated from the snow.
Postscript: The weather center in Cambridge Springs has indicated that this storm has presented us with 38 inches and the long time residents have told us this is the most snow in one storm in over 50 years. Heck, we don't know, we're new here!
Subscribe to:
Comments (Atom)